Stone Rails: GardenRailways
I had started working in HOn30 in 1980 and through that stumbled across the Garden Railways using O gauge as it was done in Britain and in 1/22.5 scale as done by the German firm LGB. I started following what was going on and in 1983 bought an LGB starter set.
I liked the size of the German company's trains and decided that I could adapt them to 1/24 th scale which was 1/2 inch to the foot in America, a much handier building scale for most Americans.
A move to a hillside lot of our own in 1982 allowed me to start thinking seriously about going outdoors. And late in the Spring of 1985 I started excavation for my first Garden Railroad.
The first layout was a simple "dog bone" track plan. This modest set up was because of the dirt, rock, and gravel moving needed, and the fact that the train layout had to go into the fenced off dog area. I knew that the LGB trains and track were supposed to work fine outdoors, and I was still a bit skeptical. But sure enough they worked fine and even ran in a light rain shower on track power with no problems!
As that first summer continued, I started building a couple of kits and scratch built structures, including a wooden bridge which I treated with used motor oil to stand up in the weather. The layout was "permanent" in that it would remain outdoors year around.
As that first summer continued, I started building a couple of kits and scratch built structures, including a wooden bridge which I treated with used motor oil to stand up in the weather. The layout was "permanent" in that it would remain outdoors year around.
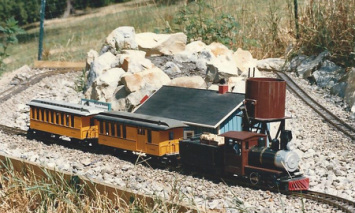
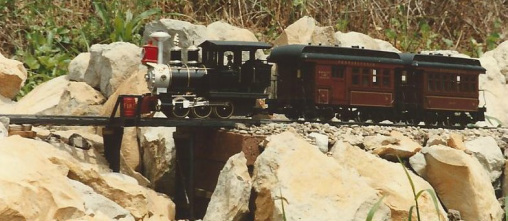
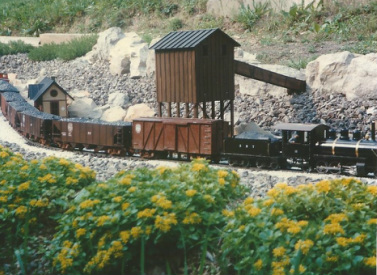
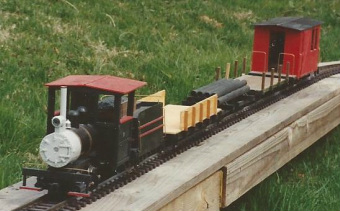
The train is all LGB, except that the European 0-4-0 tank loco has been "Americanized" with a new loco shell and a scratch built tender. The loco boiler is a piece of PVC plastic pipe with domes carved from pieces of a broom handle, the stack was a length of Plastruct plastic tubing with a small plastic funnel cut apart and turned into a "balloon" stack top. The cowcatcher and cab were built from model aviation plywood and the boiler bands are lengths of brass strip bent to shape. The tender is all model aviation plywood riding on LGB "arch bar" trucks and couplers.
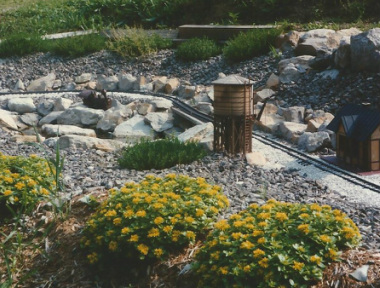
The station is an early kit and the open top water tower is scratch built with 3/8x3/8 inch strip wood legs, a spout made from lengths of wooden dowel cut and glued together, and the tank is scribed balsa wrapped around a Planter's Peanut can. Obviously these wooden buildings were taken indoors after each train running day.
The station is an early kit and the open top water tower is scratch built with 3/8x3/8 inch strip wood legs, a spout made from lengths of wooden dowel cut and glued together, and the tank is scribed balsa wrapped around a Planter's Peanut can. Obviously these wooden buildings were taken indoors after each train running day.
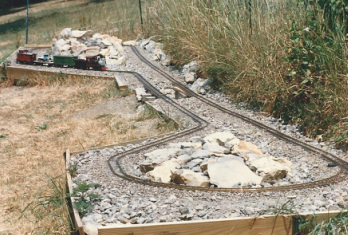
The next Spring, I cleaned the track, hooked up the power pack, and ran trains! Bolstered by this successs, I started planning an expansion. After almost a whole summer at work building a new roofed patio, I changed the track plan by adding to the leveled area and built a wooden baseboard to run track from the layout to shelf on my newly built back patio. Switches were added to allow the trains to go around and around, change direction either way, or run to the patio.
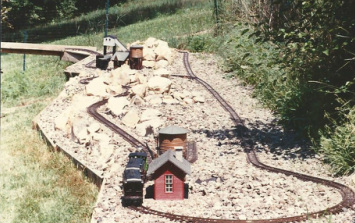
More buildings were added, mostly Pola plastic kits that could remain outside all year around.
More buildings were added, mostly Pola plastic kits that could remain outside all year around.

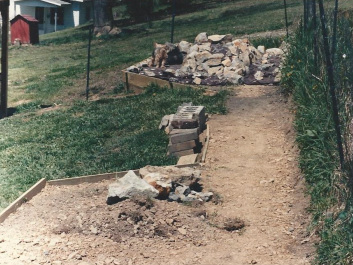
In 1987, another expansion was started. This one would connect the layout to the patio shelf at both ends to allow for a "run through" capability and around onto the "garden" layout. Once again more leveling and more gravel to walk on was required and if you look closely toward the back of this photo you can see the string line for the connecting structure at the opposite end from the earlier connection. I started putting a few rocks from a large highway cut in the trunk of my car on the way home from work everyday to get enough for this layout.
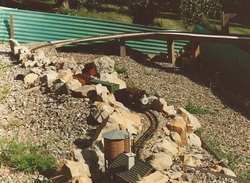
Late in the summer, the construction was finished enough for running trains. The dogs had been banished to the other side of the green fiberglas sheet fence.
I had started having problems with track power due to the rail joints being spread by freeze/thaw of the winter weather. I had to replace a LOT of rail joiners while rebuilding this latest layout. I bought a Bachmann Big Hauler set that was battery powered which allowed me to have two train operation with a track powered train. However, by this point track power was becoming a pain in the butt.
I had started having problems with track power due to the rail joints being spread by freeze/thaw of the winter weather. I had to replace a LOT of rail joiners while rebuilding this latest layout. I bought a Bachmann Big Hauler set that was battery powered which allowed me to have two train operation with a track powered train. However, by this point track power was becoming a pain in the butt.
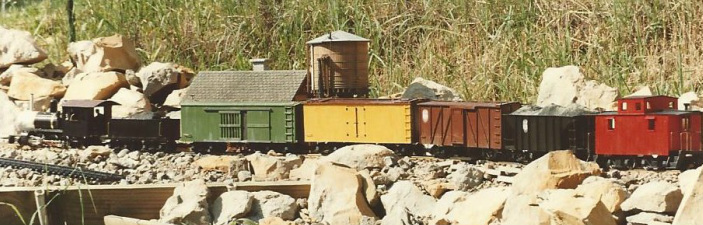
Here's an all scratch built train in G scale. The locomotive is my version of East Broad Top's 2-6-2 number 11 built on the chassis of an LGB 2080 D German tank engine. A scratch built tender on LGB trucks was added.
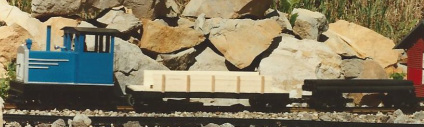
All the cars were model aviation plywood with scribed balsa sheet for wood sheeted cars. There is a "ventilated" box car in green, and yes both sets of doors worked. Next is a refrigerator car, followed by a "steel" EBT box car and three bay hopper, and the caboose is also loosly based on the EBT cars.
All the cars were model aviation plywood with scribed balsa sheet for wood sheeted cars. There is a "ventilated" box car in green, and yes both sets of doors worked. Next is a refrigerator car, followed by a "steel" EBT box car and three bay hopper, and the caboose is also loosly based on the EBT cars.
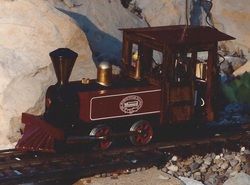
During the late 1980's and into the 1990's, American manufactures started to appear to fill the gaps of American style trains in LGB's product lines. One of my favorites was Delton Locomotive Works of Delton, Michigan which made the loco and cars here.
The loco is a freelanced 1800's 0-6-0 tank loco, which I have only slightly dressed up. The cars were similar to the short Seirra Railroad coaches, but narrow gauged.
In the later 1990's Delton fell on hard times and Lionel bought up their tooling. Everyone was hopeful that Lionel would upgrade their rather crude G guage line, but after selling remaining Delton stock off, they used parts of the tooling to go back to making cheapie trains in this scale.
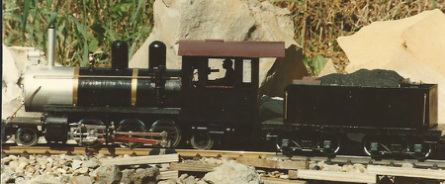
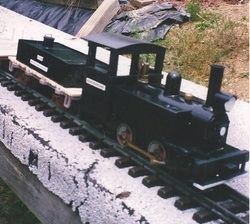
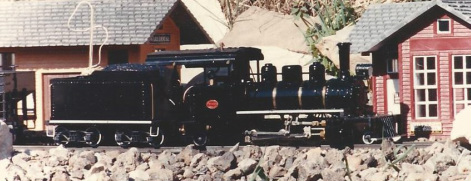
This was the "big power" on my garden railroad, a 2-6-2 loco built from a photo of EBT number 11. The loco's chassis was an LGB 2080D German tank engine. The boiler is a length of PVC plastic pipe with domes carved from broom handle bits. The cab and tender are made from model aviation plywood and the stack is brass tubing. Also made of various brass items are the boiler bands, hand rails, pilot stays, and boiler bands. The bell is LGB and the engineer figure is a modified Bachmann Big Trains figure. The coal pile is carved "bead board" styrofoam.
A few years later this loco was rebuilt with rivets formed of glue drops, turned brass "Baldwin" style domes, and several small detail parts applied.
A few years later this loco was rebuilt with rivets formed of glue drops, turned brass "Baldwin" style domes, and several small detail parts applied.
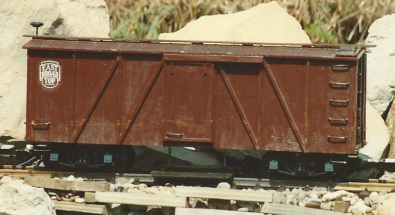
After one of my several visits to the East Broad Top Railroad, I had taken photos of an EBT steel box car and decided to build my own from scratch. As usual, the body was built from the durable model aviation plywood, the side braces were strip wood, the roof walk was scribed balsa sheet, grab irons and the brake staff were brass rod, and the strap steps were strips of soda can metal, doubled for strength. The brake wheel was a large plastic button. (Details in large scale were slow in coming, so you had to be inventive early on.) I did find a large enough "rub on" lettering sheet with the EBT logo. The car is Pennsy Tuscan and I also weathered the car.
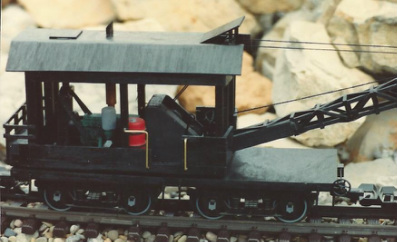
By now I was getting pretty good at scratch building in this large scale (I used 1/24 scale) and I took on the scratch building of a working crane. For a prototype, I used a steam crane which had been rebuilt with a diesel engine. Unable to find a 1/24 scale four cylinder flathead engine that I liked, I built one! All the machinery was scratch built and the "winch drums" were operated by a pair of disguised knobs on the reverse side. These could be locked with a straight pin so that the boom could be at any angle. The cab swiveled, so the crane could be staged at any point.
The boom was a real problem because it was built like a wooden model airplane wing, laid out on drawings and glued together one piece at a time. Once all four sides were assembled, they were put together to make the complete boom. Heavy sewing thread was used to "string" the operating cables.
In 1990, all my scratch building in G scale was put to the test when I was asked by Garden Railways Magazine's Mark Horowitz to write a regular series about beginner's scratch building. The series was called "Just For Kids" and ran in every issue for six years. The projects were very basic, and we found that far more adults than kids were building them!
Not long after I started writing for GR, I also started making a few model kits for sale. This became a very slow "side hobby," and never really went anywhere, but it was an interesting experience. And of course all this made me a typical third rate celebrity at train shows and two Garden Railway Conventions I attended. :-)
Not long after the 1994 Garden Railway Convention, I tore up my entire garden railroad and started planning a total rebuild. By this time I had taken on the name "Rock Ridge Route" after the town in the film "Blazing Saddles." I even had decals custom made.
There would be more greenery and I switched to colored lava rock and decorating stone instead of regular gravel. There would be NO track power on this layout from the beginning.
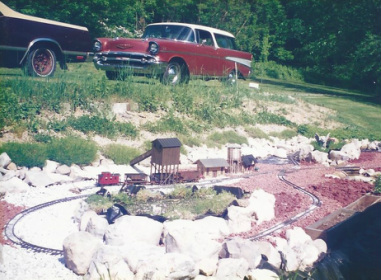
Yes, that IS a fairly rare 1957 Chevrolet Nomad station wagon. As I have said before, I'm also a "car guy" and this is just one of the old cars I've owned over the years. The vehicle in front of the Nomad is a '79 El Camino that I drove daily in good weather.
There would be more greenery and I switched to colored lava rock and decorating stone instead of regular gravel. There would be NO track power on this layout from the beginning.
Yes, that IS a fairly rare 1957 Chevrolet Nomad station wagon. As I have said before, I'm also a "car guy" and this is just one of the old cars I've owned over the years. The vehicle in front of the Nomad is a '79 El Camino that I drove daily in good weather.
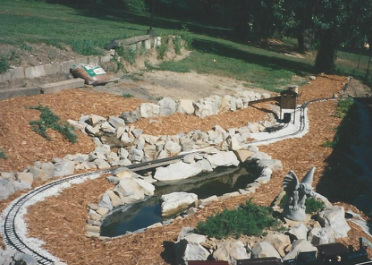
The new layout was simpler, but had more plant life and a small pond. I used Sack-Crete and my own wood forms to make a cast concrete bridge to cross the pond.
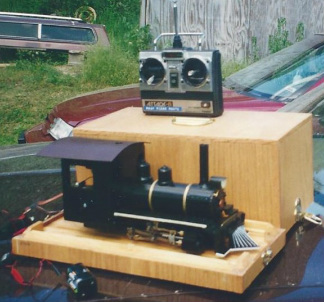
By now I had been having a lot of track power problems with dirty rails and failed rail joints and had also started running live steam locomotives. Taking a page from the battery powered Bachmann Big Haulers, I had started to convert all the track powered locomotives to battery power. Some got battery packs from R/C cars, while others got blocks of rechargable AA batteries. Three way switches controlled forward-off-reverse, and speed was controlled by the number of batteries used for each engine.
The Live Steam locos were all radio controlled and I could run two trains at a time; one steam, one battery.

In this shot it's mid-June a year later and the outdoor line is looking like a GARDEN railroad at last! The lava rock was colorful, but turned out to look goofy, so it was carefully removed and replaced with fine gravel. I had a few small gatherings for the few regional outdoor railroaders and demonstrated Live Steam for them. One was Jerry Hyde, a dealer in high end Live Steam by Astor, who went into to the locomotive building business himself with a well engineered, low cost, and durable Shay type.
This was a pretty nice looking layout and operated fine on battery power and Live Steam. The greenery caused problems, not only caring for it (I'm no gardener), but the local wildlife found it appealing! I had always had problems with my dogs digging in the roadbed and leaving "puppy bombs" at inconvenient places. There were also deer roaming in and messing up the ballast, and moles, possums, and racoons. But one Spring when preparing the layout for it's first run, I saw that the windows in my Pola station appeared to have had fogged, even though these buildings were made from UV stabilized plastic. On closer inspection, I saw that there was weed and sticks against the windows inside. A field mouse had built a nest inside the station! We waited until we were sure the family had vacated before cleaning the nest out.
I didn't know at the time, but this would be my last outdoor railroad. I was announcing auto racing and doing car shows as well as outdoor railroading and getting into the 7 1/2" gauge "ride on" trains in the summer. Over the winters I tried operating the outdoor layout once in a while and was doing "regular" model railroading in HOn30 and then On30. When I started in On30 there was no Bachmann, and all we had to go on was a very few magazine articles.
In 1997 I began to "wind down" my graden railroading. Storage space and money was becoming a problem, I was into too many hobbies at the same time and something had to go. Some of the G stuff was stored, including enough track to build another layout one day, but most was sold.
In 1997 I began to "wind down" my graden railroading. Storage space and money was becoming a problem, I was into too many hobbies at the same time and something had to go. Some of the G stuff was stored, including enough track to build another layout one day, but most was sold.
At one point in my outdoor railroading, I experimented with 7/8 inch to the foot scale, which worked out to two foot gauge using LGB track. To give an idea of the difference in size, a 7/8 inch scale four wheel "Critter" scratch built on an LGB four wheel chassis is on the left and a G scale Bachmann Big Hauler 4-6-0 is on the right.
Here's the 7/8" scale critter and train. Of course the cars are scratch built to the larger scale but use the LGB, Delton, Bachmann, or Kalamazoo trucks and couplers. For me, this was a natural progression after building HOn30 and On30 in the winters.
Here's an 0-4-0 steamer, again built on an LGB four wheel chassis with a PVC pipe boiler. The 7/8" scale locos were both battery powered from the start.
The caboose/coach was typical model aviation plywood with scribed balsa sheeting for siding. This car had benches inside along both sides of the car like Drover's cabooses or some of the cars that ran on the Sandy River & Rangley Lakes two foot gauge railroad in Maine.
My experimentation in 7/8" scale was quite brief and these were the only results.
LIVE STEAM
Like many who got into small scale Live Steam at the time, I had a couple of Mamod locos from Britain. This one has had the "Stumpy Touch" with a scratch built American cab, cowcatcher, and was upgraded from the lousy fuel tablets to a hand made alcohol burner. That alky burner really put out the heat and made the little, inexpensive engine go!
Americanizing was necessarily limited on all Live Steam locos as you couldn't change many things.
Mamod number two had a full out customizing with cab, headlight, switcher pilot, and tender/water car to carry the radio control gear. The alky burner made this one run too.
It was traded away as partial payment on a Scorpion 0-4-0 tank engine hand made in Canada.
The Scorpion was made in Canada by a good fellow who was a former British citizen.
Like most Live Steam locos in that period, it was a British style engine. I customized it to look more American. It was a heavy loco and pulled like an elephant. I traded it away for a new Hyde Shay.
Like most Live Steam locos in that period, it was a British style engine. I customized it to look more American. It was a heavy loco and pulled like an elephant. I traded it away for a new Hyde Shay.
At the time, the best buy for the money was the British "Roundhouse" brand Live Steamers. Not nearly as detailed as the high end Astor locos, the Roundhouse engines were well made, reliable, durable, and featured Butane gas firing. They heated water fast and produced plenty of steam and power.
Of course, they were British prototypes, so I "had" to Americanize this one which was Cindy's engine. Roundhouse engines were rather costly at almost $1,000. each.
Ron Brown, publisher of "Steam in the Garden" magazine had become a good friend. Cindy and I went to his annual "Steam Up" every year and I wrote articles for his magazine. His son was a master carpenter and cabinet maker, so he awarded me a custom made case for this loco.
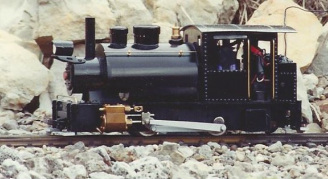
The biggest and most expensive Live Steam loco I owned was the Roundhouse 2-6-2. Here it is before I completed the American style cab.
This was a powerful, gas fired loco that could really pull a train. I offset most of the $1,200. price tag by trading my Hyde Shay and the other Roundhouse loco for this one.
This turned out to be the last Live Steamer for me.
This was a powerful, gas fired loco that could really pull a train. I offset most of the $1,200. price tag by trading my Hyde Shay and the other Roundhouse loco for this one.
This turned out to be the last Live Steamer for me.

The last two years before I got out of garden railroading and live steam, Cindy and I toured train shows and other events with a small demonstration layout. This used set radius LGB curved track and a switch, on two hollow core doors hunged together in the center for hauling and storage.
I built special short cars to make the small layout seem a little bigger and we used only a few small "footprint" structures for the same reason.
Live Steam alternated with battery power, and we would run these trains as much as eight hours a day. This is at the Centennial event at the Centre Market in Wheeling, WV.
The "Steam Power" t-shirt artwork was done by me and screen printed by the shop I did art for.
