STONE RAILS: HOn30 Page
Welcome to my HOn30 page! This is my third time dabbling with this scale/gauge combination, the previous two not being very satisfactory with only a couple of photos taken. In 2014, I became interested again, but the locomotives were still disappointing, so it was not until 2016 when the new Minitrains locomotives came along that I really got enthused again! They run well and look good without a lot of modifying. I also now use PECO HOn30 track and switches due to their good performance and appearance (I learned about them early on in On30.) Rolling stock includes much of my previous "home brew" scratch built bodies on N gauge freight car chassis and a growing number of Minitrains stock.
These days my eye site and finger dexterity is slipping, so I don't use as much detail and tend toward using materials I am more comfortable with. But of course, everything still gets the "Stumpy Touch." :-)
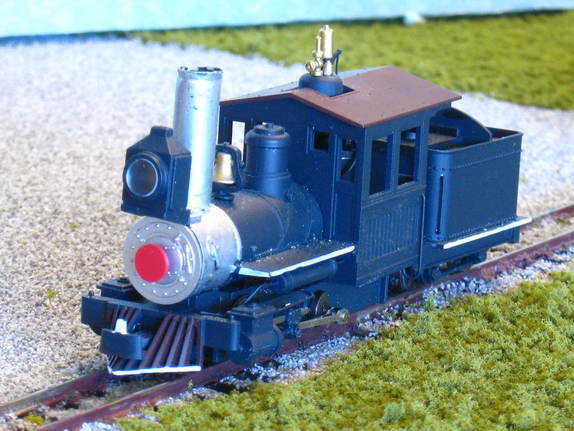
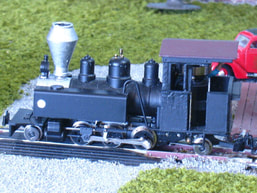
Right: No, it's not a 0-4-4 Forney, just a modified Minitrains #1002 0-4-0 and four wheel tender photographed at an angle with the tender up against the cab. (Although I'm thinking that I COULD build a Forney type out of this engine and tender!)
I've painted the smokebox and stack silver to represent graphiting, white stripes along the bottom of the "cow catcher," running boards, and tender deck, the roof and rear of the tender is red/brown. (This has long been my favorite steam locomotive paint scheme in every scale.)
Actual modifications include an engineer in the cab, the coal bunker filled with an oil tank, and the balloom stack replaced by a straight one. By the way, that stack is a plastic drinking straw. Locomotives, passenger cars, and cabooses on all "Stone Lines" roads are kept clean and "presentable" by company rule. Freight cars and maintenance of way equipment get somewhat lesser treatment.
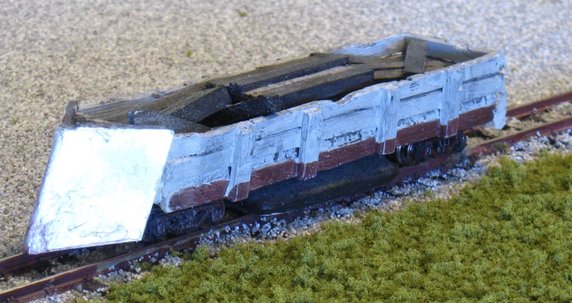
No matter the weather, the first train out on my layouts in any scale is the Snowplow! Actually this is an old John Allen style "dragger" track cleaner with a "Masonite" block under the floor. The block slides along the tops of the rails polishing them clean as the train moves.
Originally I made these "draggers" under regular freight cars, but that meant that the locomotive ran over dust and crud before the cleaner did! So I started building them all as snowplows to push ahead of the engine to keep it's wheels cleaner too.
As I have done before in every scale using track power, the "dragger" car is based on a freight car chassis (N gauge here) with a scratch built body over it. The "cleaning block" has two short roofing nails glued to it that go up through holes in the car floor. They are not attached or sprung, but the weight itself keeps the block on the rails. The pile of "ties" in the car hide the upper end of the roofing nails.
There always is a need to run a few laps with the cleaner at home before beginning operations, but I found that at train shows and other displays, the foot traffic created a LOT more dust that settles on everything. I don't really mind dust on structures and trains, but not on the track! I usually run the snowplow hourly. A lot of people chuckle at that, until I explain why I'm running a snowplow on a nice day!
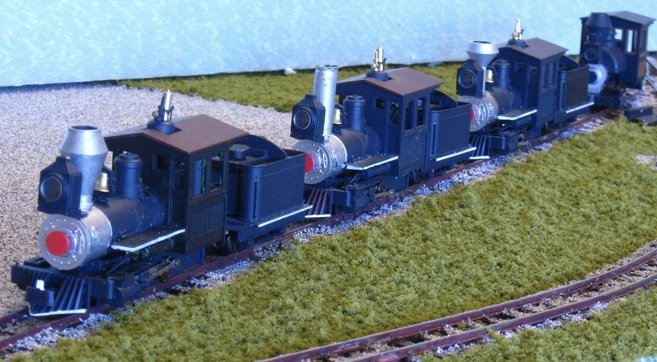
Here's the current (2017)locomotive roster, all Minitrains engines. The first three in line are the black #1002 0-4-0's with four wheel tenders. Each has a different stack, yet retains my railroad's "family" look.
All have silver smokeboxes and stacks, white trim stripes, engineer figures, and oil tanks in the fuel bunkers. The lead engine has the original stack, the second has a straight stack (made from a straw), the third has the stack from a #1011 0-6-0T Porter Saddle Tanker (a direct replacement), and the fourth engine is the Porter with the balloon stack from the third engine.
All have silver smokeboxes and stacks, white trim stripes, engineer figures, and oil tanks in the fuel bunkers. The lead engine has the original stack, the second has a straight stack (made from a straw), the third has the stack from a #1011 0-6-0T Porter Saddle Tanker (a direct replacement), and the fourth engine is the Porter with the balloon stack from the third engine.
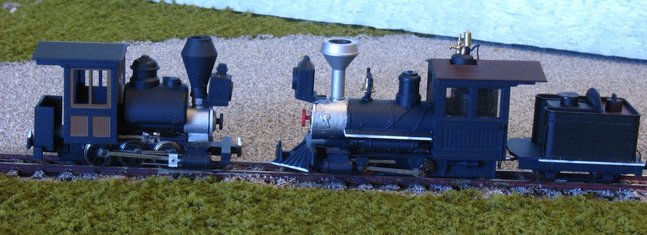
Here's a closer look at the Porter and the 0-4-0 with tender head to head. The stacks have a long, slotted screw down their center which allow for easy removal. The screws are the same for these engines, so stacks are an easy swap and changes the look of the two engines slightly.
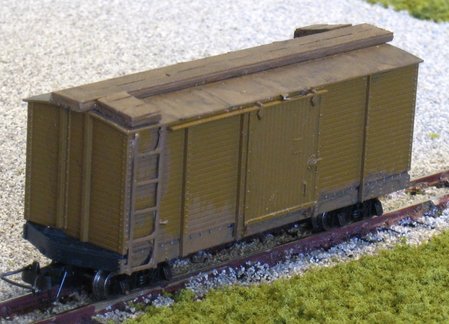
Here's another Minitrains modification, this time the #5141 US Style Box car. It has had roof ribs made of card stock, roof walk and platforms of scribed basswood, and ladder stock added. The idea is to "Americanize" the car further.
The added parts were painted with PollyScale "D&RGW Building Brown" which is a near perfect match of the original color! Weathering was done with washes of Polly Scale black and grey. I did two cars this way.
I had originally planned to cut off the rounded floor ends, but this would have made the couplers seem to stick out too far from the ends of the cars.
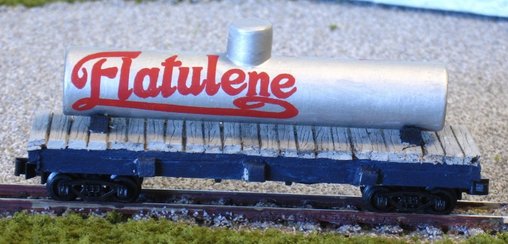
Most of my rolling stock is scratch built bodies on N gauge freight car chassis. Here a Micro Trains knuckle coupler equipped car has had a basswood flat car body with Plastic tubing tank added. I did three of these.
I had been active in On30 for a few years when I created "Flatulene ...the all natural gas." A friend made up Flatulene decals and the smaller lettering on the sheet fit HOn30 cars.
I had been active in On30 for a few years when I created "Flatulene ...the all natural gas." A friend made up Flatulene decals and the smaller lettering on the sheet fit HOn30 cars.
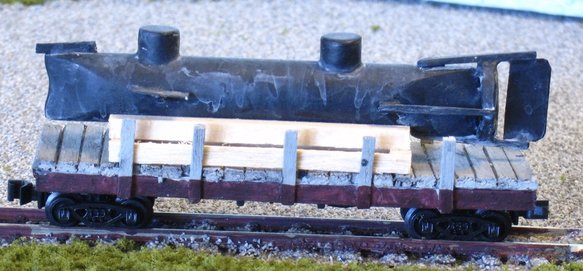
This was an interesting and unique project! The flat car is one of my simple scratch built body on an N gauge chassis cars, but the "load" is a replica of the Civil War submarine, the C.S.S. Hunley.
The Hunley model had to be made under scale to fit on the flat car. It was made of Plastruct plastic tubing and structural pieces along with card stock parts and lots of putty. The extra heavy cribbing was left unpainted, but the sub itself was lightly weathered with grey washes.
The Hunley model had to be made under scale to fit on the flat car. It was made of Plastruct plastic tubing and structural pieces along with card stock parts and lots of putty. The extra heavy cribbing was left unpainted, but the sub itself was lightly weathered with grey washes.
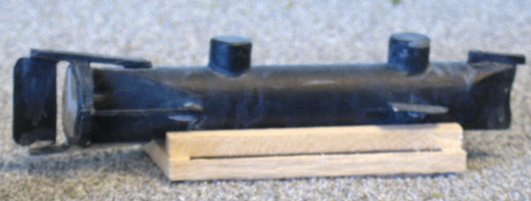
The Confederate States Ship Hunley was a true submarine, but hand cranked by a crew of nine. It's single weapon was a spar "torpedo" on a long wooden pole which would have attached to the structure atop the bow. This was rammed into the side of a wooden ship and the submarine would back away until a long rope grew tight and pulled the trigger on the charge.
The Hunley was the first submarine in history to sink an enemy ship, in this case a Union Navy blockader. Unfortunately, the Hunley was lost before it could return to port, the reason why is still debated. It was found several years ago and recovered for study. It's story is a fascinating one!
The Hunley was the first submarine in history to sink an enemy ship, in this case a Union Navy blockader. Unfortunately, the Hunley was lost before it could return to port, the reason why is still debated. It was found several years ago and recovered for study. It's story is a fascinating one!

Another interesting project was to find out what the minimum curve radius was for HOn30 trains. I have long been a fan of Micro Layouts, something I stumbled into early in my On30 work. Micro Layouts are VERY small, portable layouts which are ideal for small spaces and for transport and display at train shows.
Often the manufacturer will not post what the minimum curve radius is, or will specify a larger than necessary curvature for product reliability. I discovered this with Bachmann On30 products and made a spiral of ever decreasing curve radius as a test board. For HOn30, I used an old N gauge layout that I had never completed and added the test spiral to it.
Often the manufacturer will not post what the minimum curve radius is, or will specify a larger than necessary curvature for product reliability. I discovered this with Bachmann On30 products and made a spiral of ever decreasing curve radius as a test board. For HOn30, I used an old N gauge layout that I had never completed and added the test spiral to it.
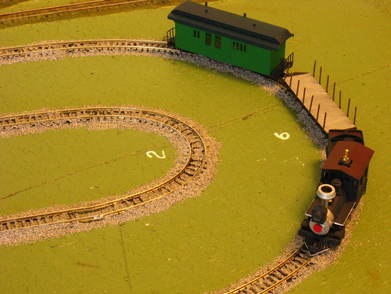
Here's a closer look at the test spiral. The original N gauge layout used 10" radius curves. I removed a siding and tied in my HOn30 test spiral with the first inside curve at 8 inch radius. There was a straight and then the second curve, set at 6 inch radius, followed by another short straight and a 4" radius curve, and finally a straight and a ridiculous 2 inch radius curve!
In the photo, you can see the number "6" beside the 6 inch curve and the "2" beside the tightest curve. Every curve is marked.
It turned out that 6 inch radius is as tight as the Minitrains loco and cars, as well as the N gauge based scratch built cars, will reliably go around every time. 4 inch radius was possible, but more often than not, the trains derailed. This makes 6" radius as the tightest reliable curve. Such a curve would allow a Micro Layout as narrow as 15" wide! Using the 8" radius, a small layout need be only 18 to 19" wide.
Of course such tight radius curves, while handy for really small layouts, tend to push the limits of believable appearance when a train rounds them! Really sharp curves like these are more akin to amusement park or small industrial operations.

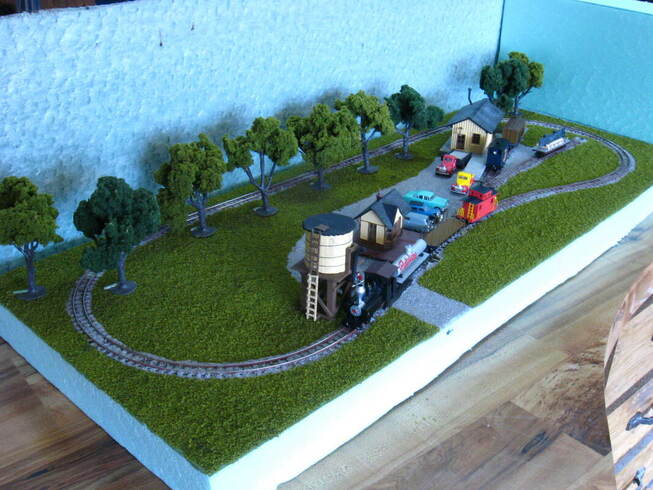
Here is the 2017 HOn30 layout built to display at the Midwest Narrow gauge Show in Greenford, Ohio. It is only 31x47 inches on 2 inch thick extruded styrofoam board. The hills are carved in extruded foam too. All the track is Peco HOn30, including the Electrofrog switches, laid directly onto the board and held down by Woodland Scenics fine ballast using Elmer's glue full strength. Curves are 10 inch radius.
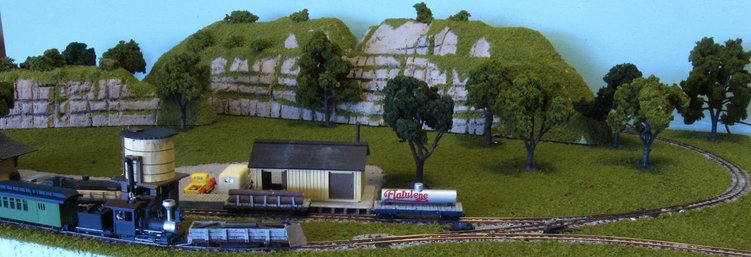
Here's a slightly different angle of the layout. I purposely left out more structures and trees to allow more open space so as to give the illusion of it being bigger than it actually is. The track also goes behind the rear hills as a "view block" so it is less obvious that this is really just a slightly squared off oval. These are basic "tricks of the eye" learned from years of building Micro Layouts.
Another advantage to a very small display layouts is that simplicity works to my advantage. Because the layout must be portable, easy to carry, and store, everything must be removable from the layout except the track, road, and ground cover. The hills, trees, buildings, vehicles, and trains fit in three cardboard boxes. It fits in the cargo area of my Chevy Trailblazer without lowering the rear seats and below window level. Because the layout is small and transport well organized, I can have it set up and running in about ten minutes, and torn down and packed in about the same time.
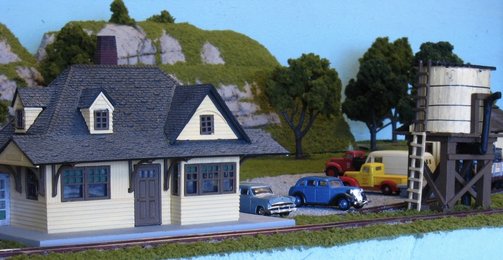
Like the trains, all structures are weathered with washes of paint.The largest structure on the layout is an Atlas HO station painted in D&RGW colors. The water tower is scratch built using strips of scribed basswood around a medicine bottle, stripe tape for bands, a piece of dowel cut at angles and glued together to make the spout, and a strip wood framework and ladder. Vehicles in this shot are Classic Metal Works repainted and trees are Woodland Scenics. Like the trains, all structures are lightly weathered with washes of paint.
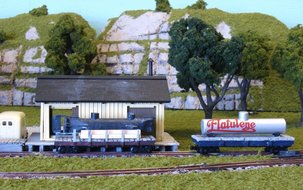
The Freight House is a common Plasticville HO one kit bashed with the platforms replaced by those made of strip wood and scribed basswood to make them fit the narrow gauge car floor height closer and painted to match the other structures. It seems that the C.S.S. Hunley is being delivered for display in town while a tank car load of Flatulene also awaits attention.
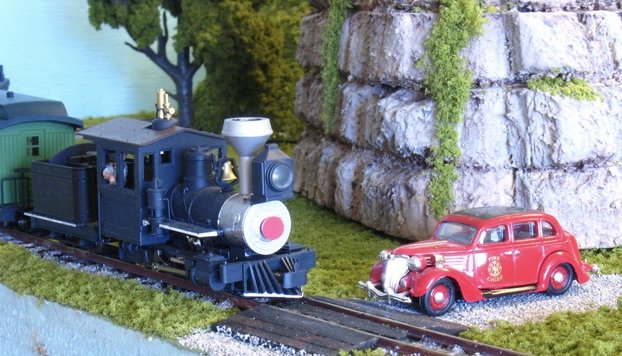
It's a good thing that speeds on this railroad are low and the local roads rough when the twice daily passenger train meets the local volunteer firemen at the Rock Ridge crossing. The '36 Ford is old, but kept shiny by the boys.
The Ford is Classic Metal Works, the crossing is made using scribed basswood, and the photo shows the carved rocks and ground foam "vines" close up. Crossing signs have yet to be made.
The Ford is Classic Metal Works, the crossing is made using scribed basswood, and the photo shows the carved rocks and ground foam "vines" close up. Crossing signs have yet to be made.
This is the HOn30 layout done for the 2019 Midwest N.G. Show in Salem, OH. This one using a very small curve radius as a test in order to allow future layouts of a small overall size. I used Peco HOn30 track and Electrofrog Switches as usual.
Minitrains states that the minimum curve radius all of their train operate on is 5.5 inches, so I used an even 6 " radius curve as standard for this layout. This makes a 180 degree curve 12" center of track to center of track or 13 1/4" over the ends of the ties. The entire layout is 15" wide by 36" long.
Every Minitrains loco and car from the little base four wheel diesel to the 2-6-2T "Trench Loco" operate fine.
The scenery is a combination of various brands and items. The
is Peco flex with all rail joints soldered, the rails painted rusty
dark brown. Ballast is Woodland Scenics "fine" Light Grey and
the ground cover is their "Course" Light Green. The Freight Station
is a kit bashed Plasticville model, the small station is their cast
metal one, and the water tower is a freelance scratch built one.
Vehicles are Classic Metal Works and Jordan.
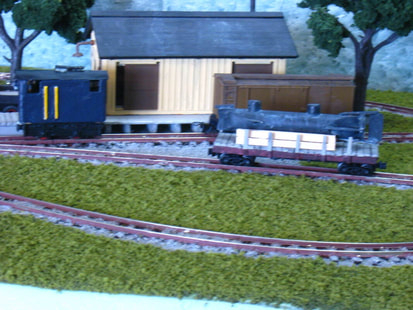
The rolling stock in this shot are a kit bashed Minitrains box car
with the rounded floor end cut off, with roof walk and platforms
and HO ladder stock added. The engine is their standard four
wheel diesel with a boxcab body. The flatcar is an N gauge car
with scratch built flatcar body. The load is my scratch built model of the C.S.S. Hunley Civil war submarine.
is Peco flex with all rail joints soldered, the rails painted rusty
dark brown. Ballast is Woodland Scenics "fine" Light Grey and
the ground cover is their "Course" Light Green. The Freight Station
is a kit bashed Plasticville model, the small station is their cast
metal one, and the water tower is a freelance scratch built one.
Vehicles are Classic Metal Works and Jordan.
The rolling stock in this shot are a kit bashed Minitrains box car
with the rounded floor end cut off, with roof walk and platforms
and HO ladder stock added. The engine is their standard four
wheel diesel with a boxcab body. The flatcar is an N gauge car
with scratch built flatcar body. The load is my scratch built model of the C.S.S. Hunley Civil war submarine.
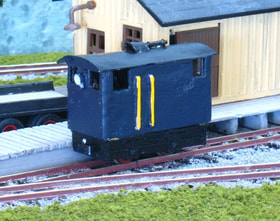
Here is a closer look at the Boxcab. It's pretty "plain jane" as it was a test project. The body is scribed balsa with a card stock roof. The card stock was laminated in two layers, the handrails are bent from mechanic's tie wire, the headlight and roof exhaust are from the base engine. The body is made "damaged," particularly the card stock roof, to depict a hard worked engine. It was painted B&O Royal Blue, but has yet to be weathered and "rusted."
I found the basic loco very problematic as it is tiny and somewhat fragile. It doesn't run as well as the better 0-4-0 steamers with four wheel tender.
I found the basic loco very problematic as it is tiny and somewhat fragile. It doesn't run as well as the better 0-4-0 steamers with four wheel tender.
Here is the engine pulling the train. It is one of the "Trench Engines" of 2-6-2T
configuration. The smoke stack is one from a 0-4-0 with four wheel tender loco,
which got the straight stack from this engine. The cab is made from parts of a Porter
0-6-0T Saddle Tank which died. The plan was to make the engine look more American.
During this project I found that the side tanks can be removed when the screws
holding the boiler are removed and the engine can be re-assembled without them.
This has me thinking that a 2-6-2 with a four wheel tender could be made to depict a
locomotive similar to a Sandy River type. A possible future project!
