Stone Rails: S Trains
I have been into S gauge three times in my train life. The first time I was four years old, and I had American Flyer trains, even keeping them after I was moved to HO scale at age eight. I wore the Flyer out and finally it was packed away in the basement storage cupboard. Sometime before I got married, it "disappeared" as many children's toys did when they grew up.
I returned to S Gauge in the seventies for about ten years. By now American Flyer stuff was out of production, but "used trains" could still be had at yard sales and in a few hobby shops which did some S gauge business. There was also a lot of kit building, scratch building, "kit bashing" and customizing old Flyer was common.
I came back to S for the third time in late 1999, and found the scale completely changed! Gone were most of the "builders" and the collectors had taken over. The prices for old Flyer had skyrocketed. When I started doing what I had in the seventies, I was roundly abused for "cutting up old trains." Because I knew what was in demand or rare, I steered clear of it, as much because the prices were too much for me to handle and my not wanting to damage collectable items.
It was VERY obvious that in the years I was away, construction skills and inventiveness had been replaced by checkbook railroading. I began buying old Flyer stuff out of hobby shop and train show junk boxes and rebuilding old locomotives, kit bashing rolling stock, and scratch building. When finished, they looked a little more like real locomotives and cars than most of the stuff which wore American Flyer Lines on their flanks. I had become a "Hi-railer;" using "toy" rail, wheel flanges, and couplers, to represent a "model" railroad. And I decided to share what I was doing with the rest of the hobby.
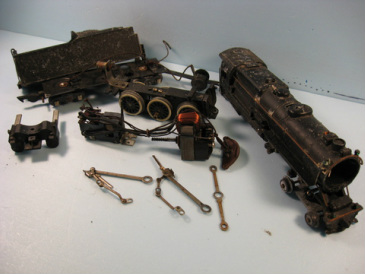
Here's a fairly typical junk find. This is a Flyer #312 "Pennsylvania K-5" that had been in a cardboard box of trains in a wet basement since about 1964. I was there when it was brought into G&M Train & Hobby and was offered the box of trains for $35. But the shop owner bet me that I would never get it running again. If I won, I got a full refund and kept the box of old trains.
The photo at left is AFTER I had soaked the locomotive and tender in a tub of diesel fuel for a month, and then soaked all the screws and bolts with PB Blaster penetrant! It took four months to clean everything as best I could, figure out what I needed, find it, and rebuild the engine.
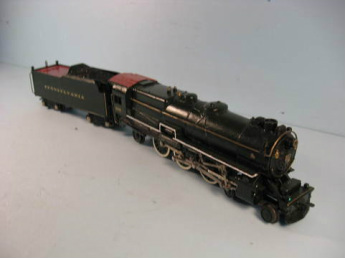
Here's the same #312 six months after I found it! As is my habit, I replaced the original Flyer motor and reverse unit with a DC can motor. (The original motor and reverse unit were solid rust anyway.) Otherwise, all the running gear was cleaned and refurbished to smooth operation.
The engine is now "really" a Pennsyvania K type as it is in "Brusnwick Green" livery with red cab roof and tender deck and white striped running boards. All the handrails, marker lights, and other such parts were pained "brass" color, including the Pennsy "Keystone" number plate.
Needless to say, I got my $35. back and the shop owner offered to buy the loco back! As it was, I kept it for several years and eventually sold it at a Spring S Spree to a guy who would appreciate the engine.
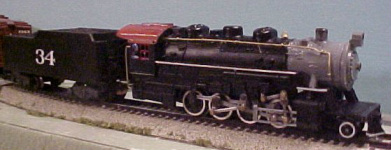
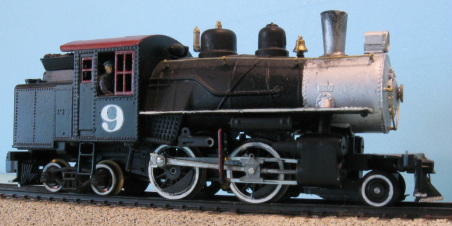
Here is the infamous 2-8-0 that almost had me "defending my honor" in the parking lot at a Spring S Spree! Certain that I "had butchered a collectrable #343 0-8-0," an older collector raged at me and said he would "take me out to the parking lot to be thrashed for what I had done!" Fortunately his friends dragged him away after I assured him that if we both went outside, I'd be the only one to WALK back in. (After 28 years in the school system, I know how to handle "mouthy kids" like this.)
I had purchased a box from under a table at a train show and found a #343 shell and incomplete chassis. There was no tender, motor, side rods or pilot with coupler, among other missing pieces. It took two years to find all the parts and I had to make a couple from scratch. I decided that while I was at it I would make the loco into a 2-8-0, as I had seen done several times some years before. I used a two wheel lead truck from Putt Trains, scratch building a pilot deck to fit onto the loco by the front boiler screw. (Picture at left.) There was no "butchering" required!
The 2-8-0 served me for several years and I eventually found a complete but damaged original tender and the original 0-8-0 pilot deck and coupler. I fixed the tender and it replaced the common plastic one. I sold the loco with original pilot deck thrown in too at the 2014 Spring S Spree.
The 2-8-0 served me for several years and I eventually found a complete but damaged original tender and the original 0-8-0 pilot deck and coupler. I fixed the tender and it replaced the common plastic one. I sold the loco with original pilot deck thrown in too at the 2014 Spring S Spree.
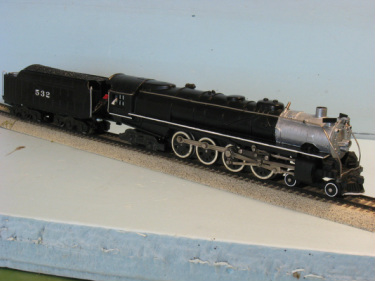
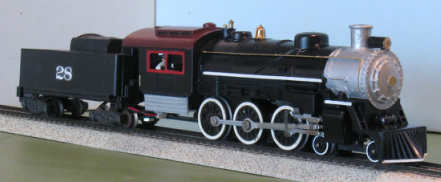
This is a #332DC loco that came into the hobby shop for repair and was missing more parts than the customer wanted to pay for. I took it on as a project, replaced the original motor which was worn and fried, put a Hudson tender behind it, and found most of the missing pieces. By then, the hobby shop owner didn't want it ! So I finished it off with a custom paint job, somewhat like the Union Pacific 4-8-4s.
The American Flyer 4-8-4 Northern is a BIG locomotive! So big that after I finished it, I found that it didn't like S Helper's Flyer radius track all that well. The overhang of the pilot and the cab in the curve was excessive. After running it off and on, it was sold at a Spring S Spree to a friend from Dayton.
By the time I had done this engine, I was developing a following of people who wanted to learn how to rebuild old locos and a few that wanted to buy whatever I had built.
In 2011 I did a "guide" for "Kit Bashing American Flyer Locomotives" which explained what steam locos to buy, how much to pay, what modifications to do, and showed examples. I e-mailed copies to anyone who requested them and they became somewhat popular.
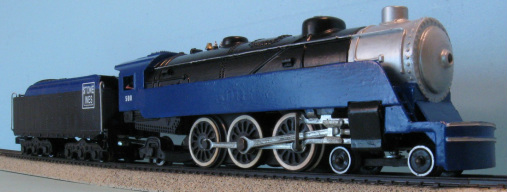
The locomotive on the left was one of the examples of what could be done, a semi-streamlined passenger engine. The 282 Pacific shell underwent a lot of work with a rounded pilot and skirts along the running board, rivets removed from the cab to represent a "welded" cab, a rounded boiler front like the Canadian "Royal" Hudsons, and a Hudson tender, all finished in glossy black, Conrail blue, and silver.
The locomotive on the left was one of the examples of what could be done, a semi-streamlined passenger engine. The 282 Pacific shell underwent a lot of work with a rounded pilot and skirts along the running board, rivets removed from the cab to represent a "welded" cab, a rounded boiler front like the Canadian "Royal" Hudsons, and a Hudson tender, all finished in glossy black, Conrail blue, and silver.
Chuck Harrington asked if he could run the loco bashing guide as an addition to his My Flyer Trains website (http://myflyertrains.org) and I agreed. The steam locomotive guide was followed by "EZ Scratch Building S Gauge Freight Cars" and "Make You Own S Operating Cars" both of which went right to the My Flyer Trains website.
In 2012 I was invited to do a construction series called "Stumpy's Station" and did so monthly until the end of 2014. One of the more unique projects was "Project Atlantic" in which I cut the distinctive Wooten firebox off a #303 Atlantic and grafted on the firebox and cab of a junk Pacific shell. In addition, I did a custom paint job as well. This became one of the biggest e-mail question getters of the series! I suspect there may be some other Atlantics getting this treatment even now.
In 2012 I was invited to do a construction series called "Stumpy's Station" and did so monthly until the end of 2014. One of the more unique projects was "Project Atlantic" in which I cut the distinctive Wooten firebox off a #303 Atlantic and grafted on the firebox and cab of a junk Pacific shell. In addition, I did a custom paint job as well. This became one of the biggest e-mail question getters of the series! I suspect there may be some other Atlantics getting this treatment even now.
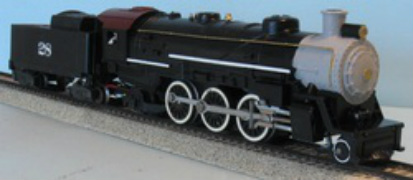
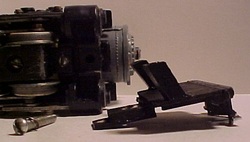
Locomotive projects were popular in Stumpy's Station. Over the winter of 2013-14 I did the "Prairie Dog" project for My Flyer Trains. I added an taller stack, top of the boiler mounted headlight and other small changes to a #283 Pacific. But the real deal in turning it into a 2-6-2 Prairie type was cutting the four wheel lead truck in half to make it a two wheel type. I tested the modification before reassembling and painting the loco, and it tracked just fine. But the completed loco had problems keeping two wheel lead truck on the track. Since the series was already running at this point, I had to work against a deadline to fix the problem in time to tell my readers how to straighten this out. It turned out that gluing a washer to the truck slider under the cylinders to make the truck pivot without moving from side to side was the solution. The locomotive ran many laps at train shows after that, proving that it would work reliably.
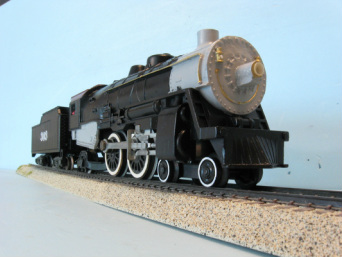
I had always wanted to do a 4-6-0 Ten Wheeler in S gauge, but the length of the Pacific shell to cover the motor after removing the trailing truck always seemed to make them look poor. The shell of a Casey Jones locomotive proved to be the solution. The Casey Jones are lousy locos compared to earlier Flyer steam engines, and I had some that I useds as "parts doners" on hand. After a little measuring and planning, I used the Casey Jones cab on the back of a 283 Pacific shell with a firebox underneath made of plastic sheet. The Casey Jones "cowcatcher," bell, pop valves, and stack also were used. A Marx tender was used because it was more the correct length for this earlier type of locomotive. The construction was explained in the Stumpy's Station section on the My Flyer Trains website in Fall 2014.
Not only have I done Flyer locos, but I have had one of each locomotive made by Putt Trains, including one of the last six 2-4-4 Suburbans made. This chunky little loco had detail parts added and a custom paint job. While Suburban types were designed for commuter service, mostly in New England, I used it extensively on a small logging layout that traveled to many train shows.
Every locomotive I rebuild or modify gets an engineer in the cab by the way.
Every locomotive I rebuild or modify gets an engineer in the cab by the way.
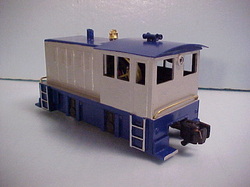
While I'm not a big diesel fan, I bought a couple of Putt Trains four wheel switchers. I made patterns and cast customizing parts to extend the stack, add a bell, air horns, ladders, steps and handrails on the front and rear pilots, a grill guard, an arched cab roof, and sideframes to cover the exposed wheels. Since I had to make molds, I made up about a dozen extra sets of castings and gave thenm to Terry Putt to sell as dress up kits
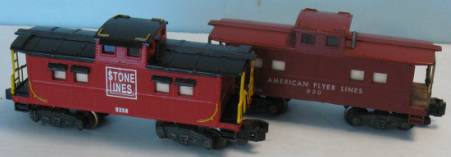
While I agree with the old model railroader's adage "You can never have enough motive power," I also rebuild and customize rolling stock. The two in the photo at the left were identical lighted #930 cabooses. Roof ribs, window shades, a "T" stack, and a nice paint job made the one on the far left a real looker.
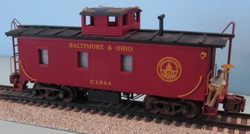
Here's another center cupola caboose, but it didn't start out that way! This one was an American Models wood sided caboose with the cupola at one end. I wanted a B&O car, which were almost all center cupola or bay window cars. This required building a new roof that would accept the AM cupola, but in the center.
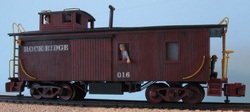
Here's another American Models caboose, this one modified into a side door type.) The doors came from a Bachmann On30 boxcar. Like locomotives, my cabooses get figures of different crewmen.
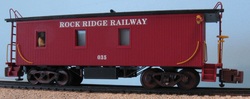
Yet another American Models caboose, this time a Transfer type with no cupola. When moving a cupola or removing one altogether, a new roof must be made to match the one that came with the original car.
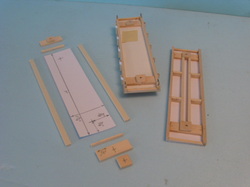
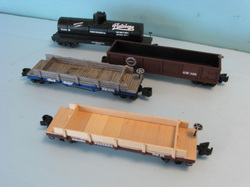
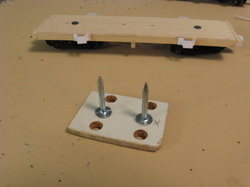
As part of my "EZ Sratch Building S Gauge Rolling Stock" I started by showing how to build flatcars. From this I built several other cars that beginning scratch builders could tackle. All would be based on the flat car they had learned to build first, which incidently showed the real evolution of railroad freight cars. At left are three steps to building the floor/frame of the scratch built flat car. Below are some of the finished cars.
One car that has been around since the fifties in model railroading has been the track cleaning car. One of the simplest and best was the "dragger" developed by the legendary HO model railroader John Allen. Faced with keeping "miles" of HO track with brass rail clean for regular operations, Allen attached a small piece of Masonite (hardboard) under various freight cars, one per train, that would drag along the rails when trains ran and wipe away dust and oil. I have shown more modern era toy and model train people how to do this in every scale I've worked in and several times in S Gauge.
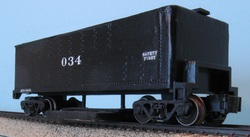
Here's one version of the John Allen "dragger" car I use, an Auxilary Tender that can go behind any steam locomotive to extend it's range. You can see the struts under the car (made from common roofing nails) connecting the car floor to the hardboard "dragger." The car itself started out as a common plastic tender with the coal bunker area cut off, and tank lids and roof walk applied.
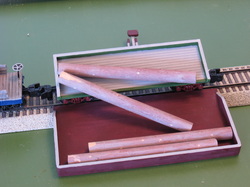
One of the fun things that was done by American Flyer was to add accessories. Among these were many "Operating" or "Action" cars. I didn't leave these out in my educating S gaugers how to build basic things and did a guide about them as well. The cars could all be easily scratch built from basic hobby or craft store materials and I showed a manual "tripping" device you could build to "dump" the load. There is also a "tray" for the load being dumped.
At left is the log car with common dowels for logs. Below is the slightly tougher to build side dump car for gravel or coal. You can just barely see the button on the manual tripping device above the center upper side of the car.
At left is the log car with common dowels for logs. Below is the slightly tougher to build side dump car for gravel or coal. You can just barely see the button on the manual tripping device above the center upper side of the car.
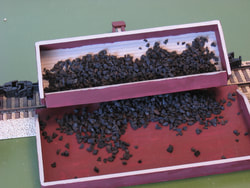
Here's a variation on the car above, this time a side dump hopper car. The basic chassis and mechanism were the same, but the car sides were higher and a side "door" was built using short lengths of brass tubing "hinge pins." I used "coal" made from ground rubber instead of rock like "cinder ballast" more commonly available.
